While you might think of taking screenshots as something only relevant on a desktop or laptop, screenshots are also useful on your smartphone. You might take a screenshot to illustrate a problem with an app, quickly record information for later, share a funny moment with a friend, or similar.
Your iPhone makes it easy to capture, mark up, and share screenshots. We’ll show you how this works.
How to Take a Screenshot on iPhone
The method for taking a screenshot on an iPhone differs depending on what model you have. All modern iPhones with Face ID and no Home button (iPhone X and later) use one method, while iPhone models that have a Home button (the iPhone SE, plus iPhone 8 and older) use a different button combination.
To take a screenshot on iPhone models with Face ID, press the Side button (on the right of your device) and Volume Up buttons (on the left side of your phone) at the same time, then let go of both. You only need to press them for a moment; if you press and hold them, you’ll open the menu to turn off your iPhone.
If you have an iPhone with a Home button, press both the Home button and the Power button at the same time, then let them go. On most iPhone models with a Home button, the Power button is on the right side. Old phones have this button on the top instead.
In either case, if you did the combination correctly, you’ll hear a shutter sound effect (if your phone isn’t muted) and see a preview of your screenshot in the bottom-left corner of your screen.
How to Edit Screenshots on iPhone
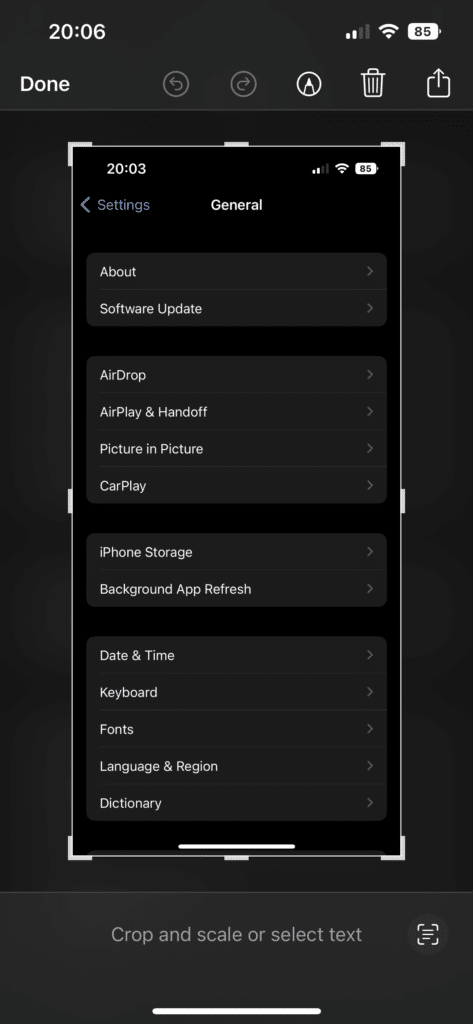
Once you’ve grabbed a screenshot, it’s easy to mark it up and send it via an applicable app. Tap the screenshot preview that appears in the corner to open it in full-screen view.
Here, you can perform several actions:
- Pinch in or out to change the zoom level of the image.
- Use the handles on the edges to crop the screenshot.
- Tap the Live Text button in the bottom-right to highlight text, which you can then copy for pasting elsewhere.
- Hit the Share button in the top-right to share the image using another app.
- Tap the Trash icon if you don’t want to keep the screenshot.
- Finally, select the Markup button (which looks like a marker) to draw on your screenshot.
In the Markup view, you have access to a handful of tools. Use the Pen, Highlighter, and Marker to draw lines with the thickness and opacity you select. Use the color wheel icon on the right to change the hue for any of the drawing tools.
The Eraser lets you delete your markup, while the Lasso tool lets you highlight and move anything you’ve drawn. There’s also a Ruler to help you measure the angle of your edits.
Tap the Plus button to access even more tools. These include adding text or a signature, changing the overall opacity, setting a magnifier, or including shapes. If you need to obfuscate sensitive information in a screenshot, the easiest way is to draw a shape over it.
As you work, the Undo and Redo buttons along the top let you fix any mistakes. When you’re satisfied with your changes, tap Done and you’ll see options to save the new photo, send it to a note, or copy and delete it.
If you want to edit a photo later, open the Photos app, select the screenshot, tap Edit on the top bar, and hit the Markup button (the marker) to open the same interface.
Alternative Ways to Take an iPhone Screenshot
There are two easy alternative methods for taking an iPhone screenshot, which you might prefer over the main button combination.
The first one is to ask Siri to take a screenshot for you. Press and hold the Side (or Home) button on your phone for a moment to summon Siri, or say “Hey Siri” if you’ve enabled that option. Say “Take a screenshot” and Siri will capture a screenshot (which doesn’t include the Siri icon).
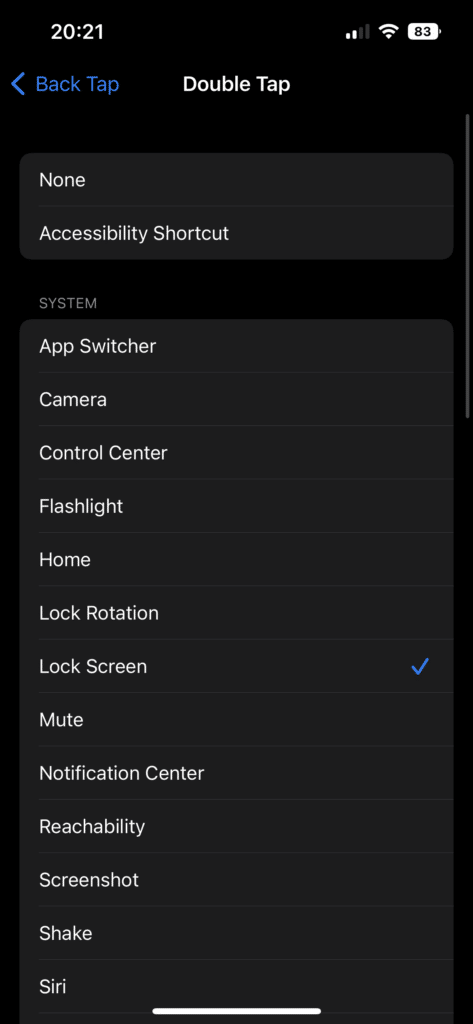
You can also use a handy lesser-known feature that’s been around since iOS 14: Back Tap. This allows you to perform shortcuts by tapping the back of your device.
Go to Settings > Accessibility > Touch and scroll down to Back Tap. Here, you can set two shortcuts; one for a double tap, and one for a triple tap. Select either one and choose Screenshot from the list to assign that action to the shortcut.
This feature isn’t perfect; your phone case will have a major effect on how it responds. You might not be able to use it if you have a thicker case, as your phone won’t pick up on the vibrations from the taps.
Utilize Screenshots on Your iPhone
With this knowledge, you’re now equipped to take, edit, and share screenshots on your iPhone. They come in handy for a lot of purposes, so don’t be afraid to snap them for any information you want to refer to later.
If you find that you have too many photos on your phone, see our guide to freeing up iPhone storage.


